블로그

Pomon P.
popomonclub@gmail.com
1. 이클립스에 스프링 개발환경 설치 후, 프로젝트 생성하기
5. root-context/servlet-context/web 설정파일 작성하기
일반적으로 로그인/회원가입/댓글등록/게시글 목록보기 등과 같이 어떤 기능을 구현할 때에는 Controller, Service, Mapper 3가지 클래스와 mapper.xml 파일을 함께 사용합니다.
하지만 로그인은 특별히 스프링 시큐리티에서 하나의 요청을 기본으로 셋팅해줍니다. 그렇기 때문에 우리는 "로그인 페이지로 이동하기" 라는 요청만 작성하면 로그인 과정을 만들 수 있습니다.
기본적으로 생성되어 있는 HomeController를 더블클릭 해서 다음과 같이 수정해 봅시다. (src/main/java/com.study.testapp.HomeController.java)
package com.study.testapp;

import org.springframework.stereotype.Controller;
import org.springframework.web.bind.annotation.RequestMapping;
import org.springframework.web.bind.annotation.RequestMethod;

@Controller
public class HomeController {

	@RequestMapping(value = "/login", method = RequestMethod.GET)
	public String goLogin() {
		return "login";
	}

}
이제 로그인 기능이 완성되었습니다! 하지만, 여기서 보시면 로그인 페이지로 이동이라고 말씀드렸는데 저희는 로그인 페이지를 만든 기억이 없습니다. 따라서 로그인 페이지를 하나 만들어 줍시다.
파일경로는 src/main/webapp/WEB-INF/views/login.jsp 입니다.
<%@ page contentType="text/html;charset=UTF-8" language="java" %>
<%@ taglib uri="http://java.sun.com/jstl/core" prefix="c" %>
<%@ taglib uri="http://www.springframework.org/security/tags" prefix="sec" %>
<html>
<head>
	<title>로그인 페이지</title>
</head>
<body>
<form action="/login" method="post">
	<sec:csrfInput/>
	<input type="text" name="id" placeholder="아이디" />
	<input type="password" name="password" placeholder="비밀번호" />
	<button>로그인</button>
</form>
</body>
</html>
이제 로그인 구현이 완료되었습니다.
이전에 account-mapper.xml 에서 회원가입을 위한 INSERT 쿼리를 이미 만들어 두었습니다. 따라서 저희는 로그인에 필요한 Service 클래스와 인터페이스를 만든 다음 jsp 파일로 페이지를 만들어 보겠습니다.
우선 Service 인터페이스 입니다. join 이라는 회원가입 함수를 만들어줍니다.
파일경로 : src/main/java/com.study.testapp.account.service.AccountService
package com.study.testapp.account.service;

import com.study.testapp.model.Account;

public interface AccountService {
	void join (Account account);
}
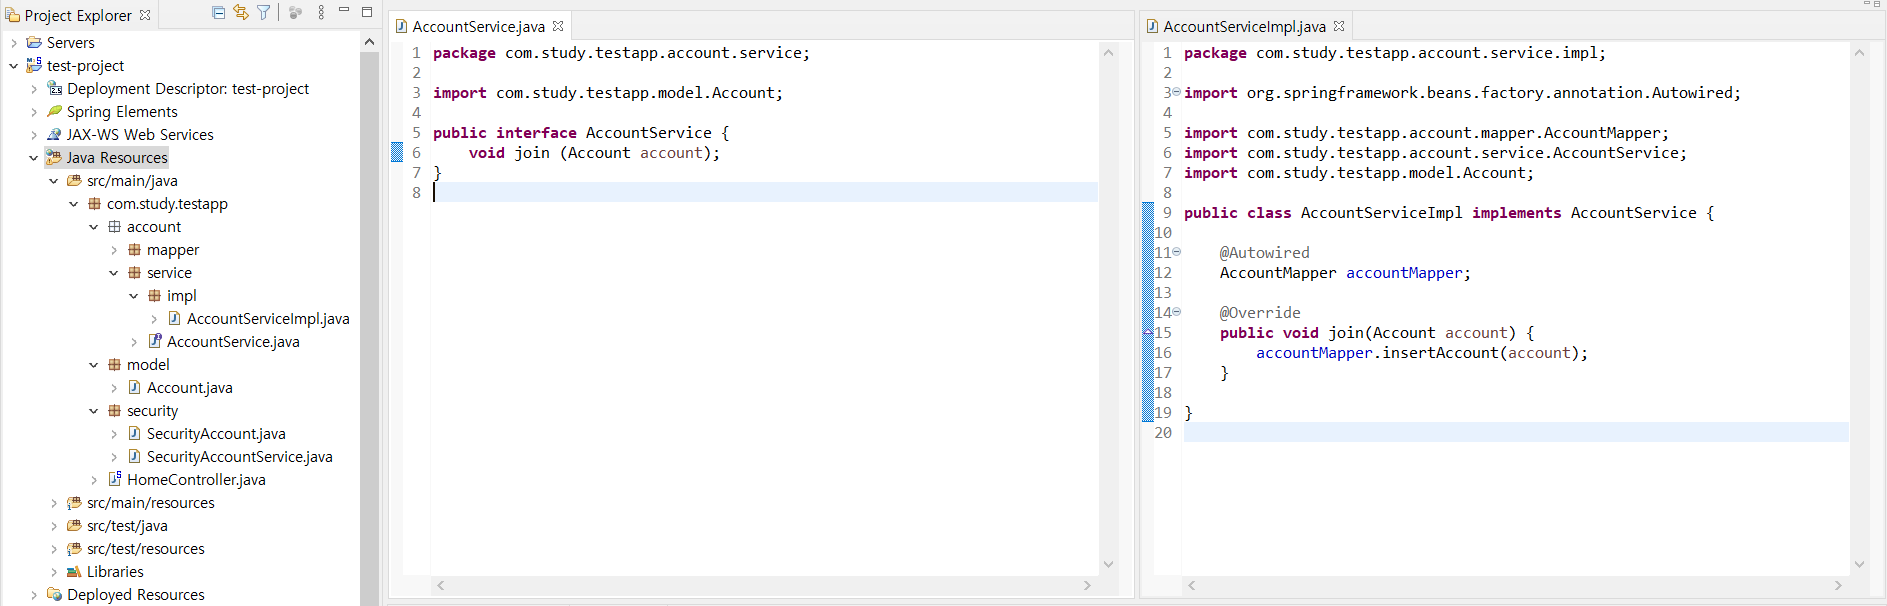
그리고 이어서 이 인터페이스에 맞게 함수를 구현하는 Service 클래스 입니다. 보시면, 이전에 만들어둔 AccountMapper를 가져와서 INSERT 쿼리를 실행하는 함수(insertAccount)를 호출합니다.
파일 경로 : src/main/java/com.study.testapp.account.service.impl.AccountServiceImpl
package com.study.testapp.account.service.impl;

import org.springframework.beans.factory.annotation.Autowired;
import org.springframework.stereotype.Service;

import com.study.testapp.account.mapper.AccountMapper;
import com.study.testapp.account.service.AccountService;
import com.study.testapp.model.Account;

@Service
public class AccountServiceImpl implements AccountService {

	@Autowired
	AccountMapper accountMapper;

	@Override
	public void join(Account account) {
		accountMapper.insertAccount(account);
	}

}
다음과 같이 생성하시면 됩니다. 파일이 잘 생성되었는지 확인해주세요!
이어서 회원가입 요청을 위한 코드를 컨트롤러 안에 작성해 보겠습니다.
스프링 부트가 아닌 스프링 레거시 프로젝트 에서는 Controller, Service, Mapper(Dao) 클래스를 하나씩 생성하여 각각의 분야를 관리하지만, 저희는 작성을 좀 더 쉽게 하기 위해 기본적으로 생성되는 HomeController 안에서 모든 컨트롤러 코드를 작성하도록 하겠습니다.
회원가입 페이지로 이동하는 요청은 RequestMethod.GET 을 붙여서 만들어 주었고, 회원가입을 직접 실행하는 요청은 RequestMethod.POST 를 붙여서 만들어 주었습니다.
package com.study.testapp;

import org.springframework.beans.factory.annotation.Autowired;
import org.springframework.stereotype.Controller;
import org.springframework.web.bind.annotation.RequestMapping;
import org.springframework.web.bind.annotation.RequestMethod;

import com.study.testapp.account.service.impl.AccountServiceImpl;
import com.study.testapp.model.Account;

@Controller
public class HomeController {

	@Autowired
	AccountServiceImpl accountService;

	@RequestMapping(value = "/login", method = RequestMethod.GET)
	public String goLogin() {
		return "login";
	}

	@RequestMapping(value = "/join", method = RequestMethod.GET)
	public String goJoin() {
		return "join";
	}

	@RequestMapping(value = "/join", method = RequestMethod.POST)
	public String login(Account account) {
		accountService.join(account);
		return "login";
	}

}
이제 회원가입 페이지를 작성해 보겠습니다. 다음과 같이 join.jsp를 만들어주세요.
파일 경로 : src/main/webapp/WEB-INF/views/join.jsp
<%@ page contentType="text/html;charset=UTF-8" language="java" %>
<%@ taglib uri="http://java.sun.com/jstl/core" prefix="c" %>
<%@ taglib uri="http://www.springframework.org/security/tags" prefix="sec" %>
<html>
<head>
	<title>회원가입 페이지</title>
</head>
<body>
<form action="/join" method="post">
	<sec:csrfInput/>
	<input type="text" name="id" placeholder="아이디" />
	<input type="password" name="password" placeholder="비밀번호" />
	<input type="password" name="confirmPassword" placeholder="비밀번호 확인" />
	<input type="email" name="email" placeholder="이메일" />
	<input type="text" name="phone" placeholder="전화번호(-없이)" />
	<button>회원가입</button>
</form>
</body>
</html>
이제 회원가입, 로그인 기능이 완성되었습니다. 이제 로그인을 한 이후에 사용자 정보에 대한 데이터를 어떻게 사용할 수 있는지를 알아보겠습니다.
홈페이지로 이동하는 요청을 다음과 같이 컨트롤러에 추가합니다. 보시는 것과 같이 Authentication 객체를 매개변수란에 넣는 것만으로 로그인 정보를 가져와서 사용할 수 있습니다. 이 객체는 사용자 아이디, 암호화된 비밀번호, 권한 3가지 정보를 조회할 수 있습니다.
package com.study.testapp;

import com.study.testapp.security.SecurityAccount;
import org.springframework.beans.factory.annotation.Autowired;
import org.springframework.security.core.Authentication;
import org.springframework.security.crypto.bcrypt.BCryptPasswordEncoder;
import org.springframework.stereotype.Controller;
import org.springframework.ui.Model;
import org.springframework.web.bind.annotation.RequestMapping;
import org.springframework.web.bind.annotation.RequestMethod;

import com.study.testapp.account.service.impl.AccountServiceImpl;
import com.study.testapp.model.Account;

@Controller
public class HomeController {

	@Autowired
	AccountServiceImpl accountService;

	@RequestMapping(value = "/login", method = RequestMethod.GET)
	public String goLogin() {
		return "login";
	}

	@RequestMapping(value = "/join", method = RequestMethod.GET)
	public String goJoin() {
		return "join";
	}

	@RequestMapping(value = "/join", method = RequestMethod.POST)
	public String join(Account account) {
		account.setPassword(new BCryptPasswordEncoder().encode(account.getPassword()));
		accountService.join(account);
		return "login";
	}

	@RequestMapping(value = "/", method = RequestMethod.GET)
	public String goHome(Model model, Authentication authentication) {
		if(authentication != null){
			SecurityAccount account = (SecurityAccount)authentication.getPrincipal();
			model.addAttribute("username", account.getUsername());
		}
		return "home";
	}

}
기존에 제공되고 있던 home.jsp 파일을 조금 수정해 보겠습니다. 로그인이 되어있지 않다면 Hello 가 나오고, 로그인이 되어있다면 Hello [사용자 아이디] 가 나올 것입니다.
<%@ page contentType="text/html;charset=UTF-8" language="java" %>
<%@ taglib uri="http://java.sun.com/jsp/jstl/core" prefix="c" %>
<html>
<head>
	<title>홈 페이지</title>
</head>
<body>
<h1>
	Hello <span>${username}</span>
</h1>
</body>
</html>
여기까지가 가장 기본적인 로그인/회원가입을 구현하는 방법입니다. (튜토리얼)
프로젝트는 아래에 공개해 둘 테니 참고하시기 바랍니다.
github.com/as-you-say/spring-legacy
| [Backend/Spring] 8. 스프링 시큐리티 설정하기 (0) | 2021.02.22 |
|---|---|
| [Backend/Spring] 7. 마이바티스 설정하기 (1) | 2021.02.18 |
| [Backend/Spring] 6. MySQL 설치하기 (0) | 2021.02.18 |
| [Backend/Spring] 5. root-context/servlet-context/web 설정파일 작성하기 (0) | 2021.02.17 |
| [Backend/Spring] 4. 메이븐 패키지 설치 (pom.xml) (0) | 2021.02.17 |